
Did you lose the important files permanently on Windows 7 and want to recover them? Worry no more as retrieving the deleted files on Windows is easier than you think – as long as you’re using the right methods or tools.
To help you out, this article will walk you through several proven ways to recover deleted files Windows 7 safely and quickly.
Without any further ado, let’s cut to the chase.
What are the Common Causes of File Deleted on Windows 7?
It is difficult to pinpoint the exact cause for file deletion on Windows 7 but in most cases, the below reasons are the culprits:
- Deleting important files while trying to free up storage.
- Formatting a local disk to remove all its data
- Accidentally deleted the files
- A glitch or bug in the software can make data corrupt and unreadable
- Malware attack
Part 1: How to Recover Permanently Deleted Files in Windows 7 without Software?
Here are the most sought-after methods to recover the deleted files without any third-party tool. Implement them one by one and hopefully, one of them will get the job done for you.
1.1 Restore Deleted Files from Windows 7 from Recycle Bin
First things first, make sure you have checked the Recycle Bin for the lost files – especially if a file was accidentally deleted. To recover deleted files from recycle bin Windows 7:
- Open the Recycle Bin folder from the desktop.
- Find and select the files you want to recover.
- Hit “Recover” on the top tab to restore it to the original location.

1.2 Retrieve Permanently Deleted Files in Windows 7 from a Backup
This method is viable only if you have made a backup of your data before losing it. To verify it:
- Check your USBs, external hard drives, or any memory cards that you have used to create a backup.
- Find the backup on your Google Drive, OneDrive, Dropbox, or other platforms that offer free storage.
If a backup is found, simply download it on your computer.

1.3 Recover Deleted Files from the Previous Version
Another efficient workaround to recover deleted files Windows 7 is via the built-in feature called “Previous Version.” However, be sure that you have “enabled system protection on the drive” and also made “recovery points” for the deleted files.
Here’s how to use this method:
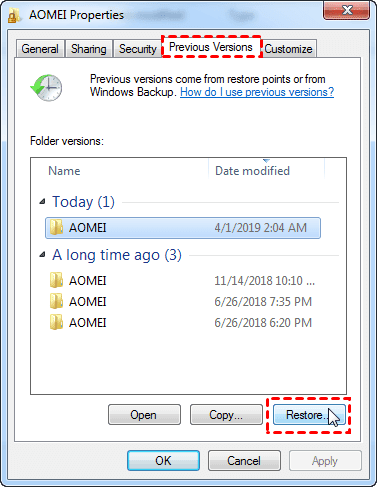
- Head to the folder containing the lost files and right-click anywhere. Choose “Restore previous versions” to get started.
- A pop up tab will show all the available “previous versions” of the folder, if any.
- Select the latest one and hit Restore. The computer will replace the folder will the previous version.

1.4 Recover Deleted Files from Windows 7 by the System Restore Feature
Windows 7 has an ingenious “System Restore” feature that empowers users to revert all the changes made to the previous state. Note that this method is best suited for Windows OS or application-related data loss; it doesn’t recover the lost personal files.
Here’s how to use this feature:
- Hit the Start icon and navigate to Control Panel.
- Search ‘Recovery” and click on Recovery > Open System Restore > Next.
- Select a folder on your computer to restore the files and hit Next. The system will restore the lost files.


Part 2: How to Recover Deleted Files on Windows 7 Using Tenorshare 4DDiG
If you want a professional tool to recover the deleted files safe and quick, then Tenorshare 4DDiG is your ideal choice. This simple yet powerful software is designed specifically to allow users to get back all the lost data on Windows with just a few clicks – regardless of the reason how it was lost.
It comes loaded with advanced features that work in tandem with its leek interface to help users recover the deleted files in a jiffy. Its efficiency, ease of use, 100% recovery rate, and blazing-fast speed make it a go-to Data Recovery Software for both beginners and professionals.
Features of Tenorshare 4DDiG
- Recover all types of files instantly
- Get back lost data from external devices including flash drives, memory cards, digital cameras.
- Retrieves data in original quality
- 100% recovery rate
- Compatible with both Windows and Mac
Text Guide
Check out yourself how easy it is to how to recover permanently deleted files in Windows 7:
Step 1
Once installed, launch Tenorshare 4DDiG on your computer.
Step 2
On its Home interface, click on the “local disk” where the lost data was originally present. Hit Start to get going.

Step 3
Now, the program will perform a thorough scan of your computer. The progress bar shows how much data has been scanned.

Step 4
Wait patiently until the scanning process is completed. 4DDiG will display all the lost files on the screen that you can also preview.

Step 5
Finally, select the files you want to recover, and hit Recover to save them on your computer. (Choose any other local disk for the recovered files to avoid overwriting).

Bonus Tips: How to Avoid Files Deletion in Windows 7?
Now that you know how tech-savvy and time-consuming it is to retrieve the lost files, let’s discuss a few useful tips to avoid losing data in the first place.
1. Make a backup of your important files
2. Hide important files to nullify the chances of accidentally deleting them. Just right-click the file you want to protect and check the “Hidden” option to make it invisible.

3. Modify the access permission. To do that, right-click the file and go to Properties > Security > Edit. Select the Username and then, check “Modify” as shown in the figure.

Conclusion
To sum up, this article provided a step-by-step guide on how to recover deleted files on Windows 7 safely. We discussed several efficient methods that you can fall back on to regain access to the lost files.
Use Tenorshare 4DDiG to retrieve all deleted files in the original quality no matter how you have lost them.


