



You have a photo of a tattoo or a hand-drawn sketch that looks a bit messy. Maybe the lighting is dim or the lines are blurry. You need a crisp, clean version of that image to use as a stencil or to show a client. Turning a complex photo into simple line art is a vital skill for any artist. It saves time and ensures the final tattoo looks exactly like the vision in your head.
The first thing you need to do is prepare your source image. If you take a photo of a drawing, make sure the paper is flat and the light is even. Shadows across the page will confuse any software you use later. You should aim for high contrast between the ink and the background. This makes it much easier for a tattoo stencil generator to pick up the edges of your design without including extra noise.
If you are working with a photo of an existing tattoo on skin, the process is a bit different. Skin has texture and reflects light, which can create glare on the black ink. You’ll want to use a tool like an image to coloring page converter to help separate the dark lines from the natural tones of the skin. These tools use smart logic to find where a line starts and ends, even if the photo is not perfect.
Once you have a clear photo, you can move on to the actual conversion process. You don’t need to be a professional graphic designer to get great results. Modern tools do most of the heavy lifting for you. You just need to follow a few simple steps to ensure the lines stay sharp and the details remain intact.
Step-by-Step Guide to Creating Line Art
Step 1: Capture or Select a High-Quality Image
Everything starts with the quality of your source file. If you start with a tiny, pixelated thumbnail, your line art will look jagged and unprofessional. Use a high-resolution camera or a scanner if you are working with paper drawings. If you are taking a photo of a tattoo on someone’s arm, try to keep the surface as flat as possible to avoid distortion.
Step 2: Increase Contrast and Remove Color
Before you run your image through a converter, you should make it black and white. You can do this on your phone or any basic photo editor. Turn the saturation all the way down. Then, boost the contrast so the blacks are very dark and the whites are very bright. This helps the software understand exactly which parts of the image should become lines.
Step 3: Use an Automated Conversion Tool
Now you can upload your edited photo to a specialized converter. These tools are designed to look for edges and turn them into solid paths. This is the fastest way to get a working stencil. You can often adjust the threshold settings to decide how much detail you want to keep. A lower threshold will give you a minimalist outline, while a higher one will capture more shading and fine lines.
Step 4: Refine the Lines Manually
Sometimes the automated tool might miss a small detail or add a line where there shouldn’t be one. Open your new line art in a drawing app like Procreate or a free program like GIMP. Use a solid black brush to fill in gaps. Use a white eraser to clean up any stray marks or “salt and pepper” noise that appeared during the conversion.
Step 5: Smooth the Paths
If your lines look a bit shaky, you can use a smoothing or stabilization feature. Most digital drawing apps have a setting that helps you draw perfectly smooth curves. Trace over the automated lines if they look too robotic or rough. This step ensures that when you print the stencil, the needle will have a clear and steady path to follow on the skin.
Step 6: Scale and Export
The final step is to make sure your design is the right size. Measure the area on the body where the tattoo will go. Set your digital canvas to those exact dimensions. Export your file as a high-resolution PNG or a PDF. This keeps the lines crisp when you print them out on a stencil machine or a standard printer.
Tips and Best Practices
Working with digital art requires a bit of patience. You should always keep your original photo on a separate layer so you can refer back to it. This allows you to check if you missed any important artistic details during the cleanup process. If the design is very complex, work in small sections rather than trying to fix the whole thing at once.
Lighting is your best friend when taking photos of physical art. Use natural light from a window but avoid direct sunlight, which creates harsh glares. If you are indoors, use two light sources from different angles to cancel out shadows. This creates a flat, even look that software loves.
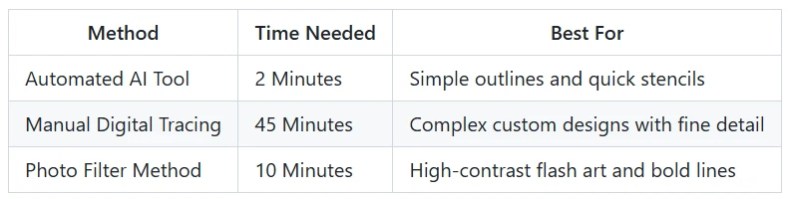
When you are refining your lines, think about the thickness. A tattoo stencil needs to be readable. If the lines are too thin, they might rub off during the tattooing process. If they are too thick, you might lose the precision of the design. Try to find a middle ground that matches the needle grouping you plan to use.
Common Mistakes to Avoid
One of the biggest mistakes is using an image with too much background clutter. If there are trees, furniture, or other tattoos in the background, the converter will try to turn those into lines too. Crop your image tightly around the design you want to keep. This saves you a lot of time in the cleanup phase.
Another error is ignoring the resolution. If you take a screenshot of a low-quality image from social media, it will likely be too blurry to convert well. Always try to get the original file or a high-quality photo. If you must use a low-quality image, you will spend much more time manually tracing the lines to make them look professional.
Don’t forget to flip your image if you are printing a stencil for a thermal copier. Most stencil paper requires the image to be mirrored so it transfers correctly onto the skin. If you forget this step, your design will be backwards once it is applied to the client.
Finally, avoid over-complicating the design. A good tattoo stencil should be a map, not a finished painting. You don’t need to include every single bit of shading in the line art. Focus on the structural lines that define the shape. You can always use the original photo as a reference for shading while you are actually tattooing.
Conclusion
Turning a tattoo design or photo into clean line art is a process of refinement. It starts with a good photo and ends with a crisp, usable map for your tattoo machine. By using the right tools and taking the time to clean up the edges, you ensure a much better result on the skin.
Whether you use an automated generator or trace everything by hand, the goal is clarity. Clean lines lead to better tattoos and happier clients. Practice these steps with different types of images to see which workflow fits your style best. With a little bit of digital prep work, you can turn any inspiration into a professional-grade stencil.


